
Kicad Area
Schematic Capture and Printed Circuit Board Software
| Home |
 Esta página em Português
Tips/comments:
1 - How Kicad the complete package, even compressed, is too large to download, especially for those using dial-up, after the user already has an installed version is not necessary to download the entire package. On the project site has a link to the separate files, just copy the whole directory WinEXE and override the old installation files in the directory of the same name in the user's machine. Also check the other directories if there is any new file or later, thus lowering only what is necessary.
2 - To change the language you are using the Kicad: open Kicad, on the Preferences-> Language select the desired language, close and reopen the Kicad for the new language is loaded. If there is even a language option from the menu, after the previous sequence does not load the new language, make sure that possesses the necessary files (internat.mo and internat.po) in the subdirectory of the directory INTERNAT corresponding tooth in the case of the Portuguese language Brazil = PT, ie x: / Kicad / internat / EN (EN = English, French = FR, ES = Spanish, etc.).. Attention, every language has its own files internat.mo interna.po and in the absence of files or directory found on the project site availability of the same (as in tip 1). Warning: from version 8.29.2005 the files .Mo and .Po had their names changed from internat to kicad, ie kicad.mo and kicad.po
3 - All modules share the current language selected in Kicad, the same goes for Help if there's their archives available.
4 - Kicad (in my opinion) an application is behaving, it does not alter the Windows Registry (R), its installation is only the creation of Kicad directory and its subdirectories on the disk of the user, is only mandatory to be in the root directory of any disk (x: / Kicad). If you want to uninstall the package, simply delete the directory x: / Kicad with its subdirectories.
5 - Kicad was developed for Linux systems, Win XP and 2000, but the package also runs on NT, and despite some problems, also with 98 and ME (the impression of PCB Pcbnew certainly not work, perhaps using some specific API).
6 - The package is in constant development and small adjustments, until the release, 25/06/2005 were available for 987 terms used in translation interface, about 1000 were still fixed in the code, after the release the amount, 01/07/2005 we now translated to 1730, but still have a few fixed terms which are adjusted in future releases.
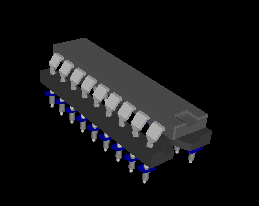
7 - How to put the IC sockets on 3D visualization: In Pcbnew, click on any empty space of the module (footprint) of the IC corresponte to be open to the Module Properties window, select the Settings tab, 3D, 3D Shape field should already be select the file corresponding 3D IC, change the field format Offsset, Z to 0.15, click on Add a 3D model in the new tab that will be created, select the 3D file corresponding to the socket. This process can be used when it is desired to produce a 3D model two or more components on the same footprint.
8 - How to use the new colored resistors: Usually any module placed in Pcbnew resistor is already linked to the 3D file of a generic resistor (no color bands), to substitute one of the resistors with the colors corresponding to the value of the resistor, just change in the Properties window of the Module / 3D Settings file that appears in the 3D shape for the desired file (note: the files of resistors used for any power, when the user connects the module in CVPCB with the desired resistor, the footprint will have the amounts due in the fields of Scale Format). Example: for Replacing a generic resistor value 1K2 on the other, just replace the file from the field of 3D Shape discret / resistor.wrl by xxx/res1K2.wings - where xxx is the name of the subdirectory where the 3D files of the resistors are placed.
9 - How to use the new electrolytic capacitors: How to tip at 8, when linking the module in the desired capacitor CVPCB Pcbnew is already bound in the corresponding 3D file, the user can select the file of that name among the new ones that are on file R_cap_eletr.zip. If you wish, you can overwrite the original files of the DISCRETE subdirectory files contained in R_cap_eletr.zip, but in the case of capacitors that are in the horizontal position the negative sign may not be the correct side.
10- The news versions of KiCad changed a lot, currently KiCad no longer need to be installed in a root directory, have an installer that assists in expanding the files and directories, creating whole new environment (note: no need to delete your previous version, but it is advisable to switch directory name!
11- From version 07/15/2008 (the considered stable by the mentor of the project), the internal architecture of the directory changed a lot!!!! Warning: if you are a user of earlier versions, a tip, before installing the new version, rename the old directory of KiCad (eg Kicadold or oldkicad in XP they will still work! ) And to migrate / copy the old libraries slowly.
12 - The new Help do not open more files like html, now a call to help (help) KiCad package is called the
corresponding .PDF file of manual in question.
13 - For users of Brazil and other nations that use the translation into Portuguese of Brazil, due to the changes mentioned above, the translation files of the interface (kicad.mo and kicad.po), currently must be placed at xxxx \ Kicad \ share \ internat \ pt \ ( xxxx = place where the user installed Kicad, the files of the manuals and help (now the same .pdf), currently must be placed in xxxx \ Kicad \ doc \ help \ pt \.
14 - The configuration file Kicad.pro used when creating a new design, which defines the libraries to be loaded by default now is located in xxxxx \ Kicad \ share \ template.